Monday, December 5, 2016

In His Glory

Well, as you know if you frequent my blog....I do love my holiday crafting.  This year the JustRite stamps they released for Christmas/holiday are just stunning!  I paired them with some background stamps and a JustRite die set to create this card:


The background on the panel was created with the JustRite Confetti Trio stamp set.  I used full ink on the top portion and stamped off (or the stamp stamp if you're quick) for the bottom to give it the fade.  I used Distress Ink.  You can use Weathered Wood, or Stormy Sky....both look great!

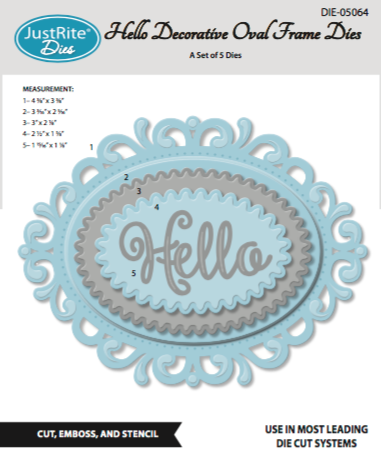
The center oval is die cut from the JustRite Hello Decorative Oval Frame die set.  The scroll border die was cut in black cardstock, and then I cut out the oval in black cardstock....but went back and cut out the scallop border oval to create the reverse scallop border you see around the scene.

To create the scene in the oval, stamp the Retro Sparkle stamp in Versamark and emboss with clear embossing powder--die cut using oval from Hello die set.  Use a soft blue Distress Ink over to get the background to pop.  Stamp and emboss the town scene and sentiment from the Nativity Sentiments set using black embossing powder.   Place town scene on oval background and trim to fit:

 
Next fussy cut the town scene and then glue to the oval:


Then use the reverse scallop oval die cut earlier and glue to the oval as a border/frame:


Glue scroll frame die cut earlier to front of card, then foam tape town scene oval piece to the center. Add banner with sentiment, bow and pearls.

Thanks for stopping by today!  Make sure to check out the JustRite site for these stamps and dies and so many more!

*****REMEMBER TO HOP.....the Just Imagine Kreaxions blog hop is still open for another couple of days....prizes to be had when you leave comments along the way!*****

Supplies:
Paper: AC cardstock--black, gray; GP white
Stamps and Dies:  JustRite
Embellishments/other: Recollection pearls, WOW embossing powder, AC ribbon

Wednesday, November 30, 2016

Just Imagine....Christmas Inspiration Blog Hop!

Welcome to the Just Imagine/Kreaxions Blog Hop So glad you could join us! We’ve kept it short and sweet so hop along to each blog, leaving a comment along the way. One participant will be chosen from the comments for a $10 Just Imagine Crafts gift certificate. The designers have tips, tutorials, and/or prizes so don’t miss out!

Here is the order of the hop:
Just Imagine Crafts Blog (http://justimaginecrafts.typepad.com/...)
Joan Borgelt (http://thegovsplace.blogspot.com/)
Laura Cox (http://www.scrapaddict4life.blogspot.com/...) <<<< You Are Here!
Candy Spiegel (http://www.candyscraps.com/)
Charity Hotrum (http://menemenetekeluniversity.blogspot.com/...)

So if you've popped onto my blog today....make sure to start at the beginning and leave comments along the way to have the chance to win!  And make extra sure you leave a comment here on my blog....I'm sending a lucky someone a little holiday card making goodie bag!

So without further ado.....here's the card I'm sharing today:


I've used the Just Imagine Kreaxions 4 in 1 Snowflake punch (punch #312)....love this one....perfect for holiday cards or wintery scrapbook pages!  I punched this border without any of the guides, and then I trimmed off the bottom edge to leave the large scalloped snowflake.  You can see the trimmed off portion at the top of my card.

The Kreaxions Sparkle Duo glitter paper makes the punched out areas pop too....love that!

Remember, the other gals on the team have some great inspiration as well....so make sure to check them out!  There is that great prize too....so don't forget to comment!

Thanks for hopping along today!

Supplies:
Paper:  AC brown, kraft, Photo Play-Holiday Cheer, Kreaxions Sparkle Duo Glitter Paper 
Tools:  Kreaxions 4 in 1 Snowflake punch 
Embellishments:  Queen & Co pearls, AC hemp twine, jingle bells, Photo Play Holiday Cheer cardstock stickers

Saturday, November 26, 2016

Time for Christmas Cards!

Need some quick card inspiration?  If your like me....you really do....because those Christmas and holiday cards need to get done pretty quick!  I've got a quick and easy card to share today....using the ever inspiring Just Imagine Kreaxions punches....LOVE all the different ways you can use them!


This card was just simply punching the border and snipping of part of it to leave the large scalloped snowflake border....super cute!

Make sure to stop by the Just Imagine blog too and say hi!

Thanks for stopping by today!

Supplies Used:
Paper:  Photo Play; AC kraft
Embellishments:  Photo Play ephemera; AC hemp twine; Tim Holtz snowflake; Zva rhinestones
Tools:  Just Imagine Kreaxions punch #312
Save

Monday, October 31, 2016

Thankfully Blessed

After a tough week around here....I really still have to remember that we are so very blessed.  Which is exactly what this card is a reminder of!


If you remember this card:


Here's the card I promised, where I used the stencil piece.  I cut it down, and added ink to completely cover it.  I also punched the border to frame out the sentiment.  Another great way to use this border punch from Just Imagine Kreaxions!

Thanks for stopping by and make sure to check out all the inspiration today over at Just Imagine in THIS POST.

Supplies Used:
Tools:  Just Imagine Kreaxions punch #310
Paper:  AC kraft cardstock; Simple Stories Pumpkin Spice 6x6 pad
Ink:  Distress Ink-Gathered Twigs
Embellishments:  burlap, Recollections enamel dots

Saturday, October 22, 2016

A Little Pumpkin Everything

Yes, I'm one of those Pumpkin Spice Latte, Pumpkin Pie, Pumpkin truffle, pumpkin everything people!  So I couldn't resist this sweet saying in the Pumpkin Spice (I think there might be a theme here...haha!) Simple Stories 6x6 paper pad.  And spicing it up a little more?  The fabulous punches from Just Imagine Kreaxions!


Now you probably notice there is no punched area.  That's because I used the punched piece on another card (coming soon!) but not before I used this piece as a stencil.

This border was punched using Kreaxions punch #310 and used as a stencil with Gathered Twigs Distress Ink.  Yet another fun way to use a border punch!  You could even make your own patterned paper this way.

Thanks for stopping by.....remember to think outside the box and even off the page, when you use those punches!

Supplies Used:
Tools:  Just Imagine Kreaxions Punch #310; Xyron Mega Runner
Paper:  Simple Stories-Pumpkin Spice 6x6 paper pad; AC kraft cardstock
Embellishment/other:  raffia, Recollections enamel dots, glossy accents, foam tape

Thursday, October 20, 2016

Frosty Beauty

Well, it's true, snowflakes are probably one of my favorite images to work with in stamping/die cutting.  As evidenced by some of my latest cards.  Here's a bright and cheerful card for the holidays, once again, using the new Small Oval Christmas Tidings stamp set from JustRite.....it's loaded with so many great images....love it!


Even with the layers this card comes together pretty quickly.

Base:  5&1/2" by 4&1/4" white cardstock A2 sized base.

First layer:  5&1/4" by 4" red cardstock.

Second layer:  5" by 3&3/4" silver POW glitter paper.

Third layer: 4&3/4" by 3&1/2" snowflake patterned paper (Doodlebug Here Comes Santa Claus)

Center panel:  First create the strip for the left side of the card by stamping the small snowflake in Festive Berries Distress Ink on a 1" by 4&3/4" piece of white cardstock.  TIP:  Start by stamping the center snowflake first and work out from there.  Mat this piece on a 1&1/4" by 4&3/4" piece of red cardstock.

Next create the base by matting the tree patterned paper (2&1/2" by 3&1/2") on a piece of red cardstock (2&3/4" by 3&3/4").  Cut POW silver glitter paper using the Vintage Labels Eleven die (3" wide die) and glue to the tree patterned paper base.

Stamp the large snowflake using Festive Berries ink and fussy cut out.  Cut red cardstock using the  1&3/4" Vintage Labels Eleven die.  Foam tape center panel to card front, and foam tape snowflake and red Vintage Labels pieces.  Stamp sentiment on white cardstock and trim to a banner (3/4" wide and about 2&1/4" long), then brush edges with ink.  Foam tape to center of red Vintage Labels piece.

To finish add a little bling and a bow.


Thanks for stopping by today!  Stop back soon for more crafty ideas!

Supplies Used:
Stamps:  JustRite--Small Oval Christmas Tidings
Dies:  JustRite--Vintage Labels Eleven
Ink:  Distress Ink-Festive Berries
Paper:  AC cardstock and glitter paper; Doodlebug-Here Comes Santa Claus
Embellishments: AC ribbon, Recollections rhinestones

Tuesday, October 11, 2016

Frosty Sparkling Joy

More new release goodies coming at you today from JustRite!  We've got this beautiful new set called Small Oval Christmas Tidings....a big name for a gorgeous big set of stamps!


I used this lovely set full of layering goodness to create this joy-filled card:


The layers on this card were created by starting with a standard A2 base of white cardstock (5&1/2" by 4&1/4") then adding a mat of the swiss dot paper (5&1/4" by 4"). 

The center panel is a 3" by 4&1/4" piece of white cardstock.  I stamped the Retro Sparkle Cling Background stamp from JustRite, using Versamark Ink, then embossed with clear embossing powder.  Next I went over the background with Tumbled Glass Distress Ink.  I added a few drops of water and also roughed up the edges of the piece to give it a more distressed look.  


To add some sparkle on the white dots/stars, I used Stardust Stickles.  I set it aside to dry, then started on the rest of the layers. 

I cut a 2&7/8" circle out of white cardstock, using the Just Imagine Kreaxions Circle Cutter, and 3&1/8" gray cardstock mat. The snowflake was stamped using Tumbled Glass and then embossed in clear.  The edges of the circle were brushed with ink, then glued to the gray circle mat.  The center white/gray mat ovals were cut out using the JustRite Joy Oval Frames, and stamped using the same method.  The word "Joy" was cut out using this same die set, these ovals are foam taped to the center of the snowflake, on the large circle, then sparkled up using rhinestones and enamel dots. 

Before the circle is attached to the card, there is another layer created using the Damask Flourish One die, cut twice and glued together, and a center band of a 1" by 4" strip of striped paper matted on a 1&1/4" by 4" strip of gray cardstock.  Here are all the pieces before the card was completely assembled:


After assembly I added a few more enamel dots to complete the card.

Thanks for stopping by today!  More inspiration soon!

Supplies:
Stamps:  JustRite-Small Oval Christmas Tidings, Retro Sparkle Cling Background
Dies: JustRite-Joy Oval Frames, Damask Flourish One
Paper:  Echo Park Winter Stripes and Dots, AC gray cardstock, GP white cardstock
Ink: Distress Ink-Tumbled Glass; Versamark
Other: Ranger Clear Embossing Powder, Recollections rhinestones, enamel dots; Just Imagine Kreaxions Circle Cutter.

Tuesday, October 4, 2016

Warm Holiday Wishes

So very excited to start sharing the new JustRite Holiday stamp release!  For the next week or so, I've got some great inspiration to get those holiday cards started!  First up, this card makes me think of warm, spicy gingerbread:


Kraft cardstock brushed with Vintage Photo Distress Ink warms up this card.  The sentiment stamp was embossed using WOW embossing powder, and is one of a new set of holiday sentiments from JustRite:


And better yet?  These beauties are on SALE right now!  You can find them HERE.

The gorgeous snowflake background is the Snowflake and Tag die set from JustRite.  I used the positive (kraft) and negative (cream) to create the look.

The sweet little tag at the top is from the set....the Merry Christmas sentiment from another new JustRite set called--Nativity Sentiments.  You'll see more about that set soon!

Thanks for stopping by today!  Stop back soon....many more Christmas treats to come!

Supplies Used:
Stamps:  JustRite--Inside & Outside Christmas Sentiments; Nativity Sentiments
Ink:  Versamark embossing; Distress Ink--Vintage Photo
Dies:  JustRite--Snowflake and Tag set
Paper:  AC cardstock--cream; Graphic 45 Twas the Night Before Christmas 6x6; kraft cardstock
Embellishments:  AC red grosgrain ribbon; AC twine; WOW embossing powder

Thursday, September 29, 2016

Halloween Hello

One of the current new release stamp sets from JustRite Papercrafts is this awesome Confetti Trio Background stamp set:


I'll have several cards coming where I've used this set, this first one has a little Halloween twist:


I stamped the background with a Hero Arts Ombre ink pad along the top, center and bottom of a 5&1/4" by 4" piece of white cardstock.  I filled in the gaps between the stripes with the 3/4" by 4" strips of Halloween patterned paper matted on 1" by 4" strips of orange paper.


The center panel was created using the JustRite Hello Decorative Oval Frames die set:

I used foam tape to build up the center panel, and added enamel dots to finish.

Thanks for stopping by today!  Stop back soon for more inspiration using these great stamps and dies!

Supplies Used:
Stamps: JustRite Confetti Trio Background
Dies: JustRite Hello Decorative Oval Frames
Paper: AC black cardstock; GP white cardstock; Graphic 45 Rare Oddities 6x6 pad
Ink: Hero Arts Ombre-Butter to Orange
Embellishments:  Recollections enamel dots

Tuesday, September 27, 2016

JustRite Quiet Sympathy

One of the things I'm most impressed by with JustRite Stamps is the way they cover every holiday and occasion you could ever want.  And yes, sometimes that means a sympathy card.


I used a nature inspired color palette and the JustRite With Sentiments dies--I diecut the sentiment twice using cream and brown cardstock, then stacking the sentiments slightly off to five the shadowed effect.  This is where the Xyron sticker maker comes in handy!

To create the pine tree "windows" I used the JustRite Three in a Row dies, cut out with brown cardstock. I layered under the green strip, then I used the square dies to cut out the three cream colored squares, then stamped the pine tree using the Multi-Step Pine Trees

I added a couple of banners, a button and some twine as finishing touches.

Thanks for stopping by today!  Stop by the JustRite site to check out these fabulous stamps and dies! 

Supplies Used:
Paper:  AC cardstock cream, brown; Simple Stories Pumpkin Spice 6x6 paper pad
Stamps:  JustRite-CR-05044 Multi-Step Pine Trees
Dies:  JustRite-DIE-05070 With Sentiments, DIE-05033 Three in a Row
Ink:  Distress Ink: Forest Moss, Peeled Paint, Gathered Twigs
Embellishments:  Jute twine, button

Saturday, September 24, 2016

Happy Haunting!

Today I'm sharing more spooky Halloween crafting....ya know I LOVE it!  Hope you do too and can get some inspiration to use these amazing Just Imagine Kreaxions Punches!


This gift bag was created using Square FR Lilly punch #924 and the gorgeous Julie Nutting Bootiful collection by Photoplay Paper.  The borders were created by using a combo of punching with and without the "A" guide.  Such a detailed punch, I added a layer of green patterned paper underneath to make it pop, and I added some enamel dots to the center of the diamond shapes for even more pizzazz....


Keep your eye out for the matching card coming soon to the blog!  You can find the blog HERE.

Thanks for stopping by today!  

Supplies Used:
Tools:  Just Imagine Kreaxions punch Square FR Lilly #924
Paper:  Photoplay Bootiful Halloween; AC purple cardstock
Embellishments:  Queen & Co enamel dots; AC ribbon; Photoplay Bootiful stickers 
Other:  gift bag

Thursday, September 1, 2016

September Hop with Practical Scrappers!

Time to hop along with some great designers with some amazing projects!  If you came here from Wendi's blog, then you are doing this right!  If not, make sure to go to Wendy's (that's indeed Wendy without the "i") blog and start from the beginning to get all the inspiration!  I've got a fun fall project for you of course....


Aren't these so cute?  I used the new Halloween collection from Carta Bella--Haunted....love love the designs on this one!

I used a wooden craft box made to alter, painted it up with black acrylic paint, then decorated it with the papers to create a book look.  They will be a fun part of my Halloween decor this year!

Here is a peek at the inside of both "books":


I used the sticker sheet to create a lot of the details....the Haunted collection has a great 12x12 sheet!

Here is the back view:


And finally the "spine" of the books:


Make sure to continue the hop and enjoy all of the inspiration along the way! Thanks for hopping with us today, and you are on to the next stop.....Christine's blog.  You'll find some amazing creativity on her blog so make sure to stop by!

And just in case....here's the complete list! 

Wendy www.stampingrules.com
Majken http://chocoscrapaholic.blogspot.com/
Alison http://alisondaydesigns.com/
Wendi http://scrappydayinparadise.blogspot.com/
Laura http://scrapaddict4life.blogspot.com/
Christine http://scrappingwithchristine.blogspot.com

Wednesday, August 31, 2016

I "HEART" Autumn!

Autumn is my absolute favorite time of year, and any crafting time I can get playing with autumn collections or projects only adds to the wonderful!!  I've created this card for Just Imagine Crafts using their punch Kreaxions #304 and their amazing circle cutter!


I've created the top border using:  Punch #304 with the straight edge "A" insert

The bottom border was created using:  Punch #304 with no insert

The center circle was created by using the Kreaxions circle cutter (best circle cutter I've ever used!) and the same punch using the "C" insert and just punching at even intervals around the circle.

Here's a closer look at the different punched sections before I completed the card....it also shows the pretty Kreaxions glitter paper I used to make the punched areas pop for the borders:


If you haven't checked out these punches yet....you should give them a try....they are so fun to play with!  And better yet they are on SALE!!  Check out THIS POST to see more inspiration and which punches are on special (HINT: My fave is one of them!!).


Thanks for stoppin' by today!

Supplies Used:
Paper:  AC kraft and brown cardstock; Simple Stories-Pumpkin Spice 6x6; Kreaxions Glitter Paper
Tools:  Just Imagine Kreaxions punch #304, circle cutter
Embellishments/Ink: DIY enamel dots; Distress Ink-Gathered Twigs

Saturday, August 27, 2016

Batty Punch Fun

Ok, I'm completely obsessed with this Kreations #304 punch!  It's true!  Today I'm getting my fall craft on with this punch from Just Imagine Crafts, and when you add some Halloween touches....it goes from a pretty and frilly border punch to a spooktacular batty look:


I punched one row of the #304 punch on a 4" strip of black cardstock without any guards/guides and then trimmed the strip in half to get the bat look for the top of my easel card, and the spooky almost spider like border across the bottom.  Then I fussy cut around one of the "bats" I punched on a separate piece of paper, backed it in orange, and it became the little bat held on by the clothespin: 
 

Can I say again how much I love this punch and all the different looks you can get from it?!! 

Well thanks for stoppin' by today, and make sure you stop over to the Just Imagine blog to say hi, and check out this punch in the store HERE.

Supplies Used:
Paper: AC black & orange cardstock, Graphic 45 Eerie Tale 6x6
Tools:  Kreaxions #304 punch, Tim Holtz thinlets Halloween
Embellishments: Trendy Twine, Doodlebug mini clothespin, Echo Park Enamel dots

Friday, July 29, 2016

Blooming in Color

One of the beautiful things about a background stamp, is you can create your own background paper in any color you choose.  I've used soft purple colors to create this sympathy card:


The background is a new JustRite release for June called Blooming Vines Background.  I stamped it in Black Tuxedo Memento Ink, then colored it in with Copic Markers.  I stamp again and cut out some of the flowers to add around the sentiment.  I brushed the edges with Black Soot Distress Ink, brushed them with some Rock Candy Distress Stickles, and after they were dry, added a center of beads from Queen & Co.

The fancy oval and sentiment were stamped and embossed, and foam taped in layers on top of the pretty die cut....another new June release, the Damask Flourish One....this one is so versatile and has instantly become one of my favorite things!!  The bow and pearl are finishing touches.

Thanks for stoppin' by today!  If you'd like to see more inspiration with these awesome stamps and dies, make sure to stop by the JustRite blog HERE.

Supplies Used:
Stamps: CL-05089 Blooming Vines Background, CR-05055 Large Oval Sympathy
Dies: DIE-05069  Damask Flourish One, DIE-05047 A2 Card Front Basics
Paper: AC white, black, purple cardstock
Ink:  Versamark, Memento Black Tuxedo, Copic Markers
Other:  Embossing powder--Ranger Fine Detail/Black, Organza ribbon, Trendy Twine, Tim Holtz-pearl drop, Queen & Co yellow Bitty Beads

Thursday, July 28, 2016

A Vintage Thanks

I've been invited to be a part of the Just Imagine Kreaxions team....these punches were new to me--and I can't believe how that my inner craft geek has come out playing with these punches!  They are amazing with one punch doing so many different looks!  My first card is a vintage thank you card:


I used their Kreaxions Punch 304 which is really versatile and can be used for anything!  I started by playing with border punching on this card.  Here I took a 1" strip of cardstock and punched using the "A" straight guard piece that comes with the punch on each side to create this border strip:


Then to created the little strip you see on the right side of the black and white striped paper, I punched a 1" strip also, but without the guard piece:

 
These things are awesome....if you've never heard of them....google a few videos....crazy cool!

Exact measurements for card:
Card Base: 5&1/5 by 4&1/4" black cardstock
First Layer: 5&1/4" by 4" frame print patterned paper (Bella Vie from Photo Play), distressed and inked.
Border Strip: 1" by 5&1/4" black cardstock punched, then layered onto Kreaxions Glitter Paper 1&1/4" by 5&1/4"
Black and White stripe (Bella Vie) piece 2&1/2" by 4" with punched edge tucked around it and layered onto a 2" by 4&3/4" piece of pink damask patterned paper (Bella Vie)
Center Panel: 2&1/4" by 2&1/2" piece of black cardstock as base, layer on frame print paper (same size, I distressed it up a bit with a distress tool and Black Soot Distress Ink).  Layer on 2" by 2&1/4" piece of pink damask, then the sentiment (from JustRite HERE) and glitter paper (1" by 2&1/4").
Finish with enamel dots.

Thanks for stoppin' by today.....make sure to check out the Just Imagine website to see all of their awesome punches and products!

Wednesday, July 27, 2016

Stamp a Landscape and More!

Well, I will be the first to tell you....I love my layers, but not necessarily layering stamps.  Especially landscape type stamps.  Until now!  I have been playing with one of the June release sets from JustRite called Multi-Step Landscape Elements.  It's been a blast!  Here are a couple of examples of cards I've created using this set:


The background on this card was created using another June release stamp Text Background Stamp I stamped it lightly (by stamping off the first time) using Hickory Smoke Distress Ink.  The sentiment is stamped in the same ink, and is from the Large Oval Sympathy set.

To create the blue frame, I used a piece of blank cardstock to mask off the center area, and then used Weathered Wood to ink up a border:


A border of black cardstock was cut out using the A2 Card Front Basics Dies.  The tree and rocks were stamped from the landscape set to create this soft and pretty card.

The next card is more landscape layers:


Using different colors of distress ink, I created this little landscaped scene.  I started with the rocks as a base in Pumice Stone with Hickory Smoke for the accent layer (these come with multi layered stamps to make shading easy!)  I added in the sweet little grass using Peeled Paint Ink....some times stamping off to create a softer color.  Then layered in grasses, bushes and flowers using Worn Lipstick, Gathered Twigs and Fossilized Amber inks.  The tree is done as it was in the card above, using Gathered Twigs (stamped off) and Peeled Paint (stamped off, but I went back and lightly dabbed with more ink to create the variation in color).  The sentiment is from the Small Oval Wishes set, and the sky is a chalked background.

There are more samples on the JustRite blog, you can check out THIS POST and watch for others too!  Love this versatile set!

Thanks for stoppin' by today!

Supplies Used:
Card One:
JustRite:
CL-05088 Text Background stamp
CR-05085 Multi-Step Landscape Elements stamps
CR-05055 Large Oval Sympathy
DIE-05047 A2 Card Front Basics
DIE-05069  Damask Flourish One
Ink: Distress Ink-Hickory Smoke, Gathered Twigs, Peeled Paint, Stormy Sky, Pumice Stone
Paper:  Basic White and Black cardstock

Card Two:
JustRite: CR-05085 Multi-Step Landscape Elements,CR-05053 Small Oval Wishes
Ink: Hickory Smoke, Gathered Twigs, Peeled Paint, Worn Lipstick, Fossilized Amber, Pumice Stone
Paper:  Basic White and Black cardstock
Other:  Pebbles chalk

Monday, July 25, 2016

Poppies Color Burst Style

As much as I am loving all the new releases from JustRite, I'm in love with the background stamps and the layering poppy stamps from this current release!  And what better to layer in some color for those poppies, but a beautiful Color Burst background:


The background was created by stamping the outline poppy stamp all over a 4" by 5&1/4" piece of white cardstock using Versamark ink, then embossing with clear embossing powder.  Then this piece was sprinkled with Color Burst pigments in Crimson and Orange then spritzed with water.  I kept adding color and spritzing until I got the look I wanted.  The colors are so vibrant, they make the card just pop, don't you think?  Such an easy way to get a watercolor look. 


The above pic is the work in progress....I added more of the Orange color around the edges after this pic....very easy to layer in more color!

The center panel  is a 2&1/2" by 3&3/4" piece of white cardstock stamped with the Text Background JustRite stamp (Black Soot ink stamped off) and then stamped over with the Chicken Wire Background JustRite stamp using Versamark embossed in black.  I roughed up the edges a bit with the Tonic Distress Tool, then matted it on a 4" by 2&3/4" piece of black cardstock.  This panel is foam taped to the card front.

The leaves and poppies were stamped and fussy cut out, then sentiment embossed in black, the frame stamped in Ripe Persimmon Distress Ink (the Worn Lipstick and this color match up with the Color Burst so well).  They are foam taped to the card, and the sentiment added.  I used the oval die set to cut out the sentiment, and to add the black lacy border underneath (I cut it in half, and glued it down so it's closer to a circle than oval). 


These poppy stamps are so much fun!  You can find them HERE.

Thanks for stoppin' by!

Supplies Used:
Stamps: CR-05081 Multi-Step Poppies, CR-05053 Small Oval Wishes, CL-05087 Chicken Wire Background, CL-05088 Text Background
Dies:  DIE-05049 Joy Oval Frames
Paper: AC white and black
Ink:  Versamark, Distress Ink-Ripe Persimmon, Black Soot, Worn Lipstick, Bundled Sage, Peeled Paint
Other:  Ranger Embossing Powder-Clear, Black Fine Detail; Color Burst-Crimson, Orange; Tonic Distress Tool; Copic Marker-Black

Friday, June 24, 2016

Roses and Thanks

If there is one thing I love....it's layers and dies to use to create them!  I've got lots of both used to create this Thank You card:


This card starts with a standard black cardstock A2 base (5&1/2" by 4&1/4") and the next layer is 5&1/4" by 4" piece of black swirl print paper (Photo Play Belle Vie).

To create the copper lattice:  Cut the JustRite A2 Butterfly Card Front die out of white cardstock, coat in embossing ink of choice (I used Ranger Embossing Dauber) and emboss using copper powder (I used Ranger).  Next step to give it a unique texture, I dabbed randomly (and lightly) over the copper embossing powder, and then used Ranger Black Soot Distress embossing powder.  This piece was glued directly to a soft script piece of patterned paper, then foam taped to card front.

Next layer of a piece of floral patterned paper cut into a large banner and mat on black cardstock.  Glue to center of card front.

For the center sentiment:
Layer 1--Vintage Labels Die (largest) from black cardstock
Layer 2 &3--Hello Decorative Oval Frame Die (plain oval from pink patterned paper and then scalloped oval from black stripe patterned paper--this layer is foam taped)
Layer 4--Vintage Labels Die (next to smallest) cut from white cardstock and brushed with Scattered Straw Distress Ink--this is stamped with border and sentiment from Small Oval Wishes stamp set.

The roses are from the Small Oval Wishes stamp set....stamped in Black Tuxedo Memento ink, colored with Copic Markers, and fussy cut out.

Add rhinestones and a bow to finish.  (PS there is a little sneak peek of a June release die....the gorgeous damask details peeking out from each edge of the sentiment oval!).

Thanks for stoppin' by today....stop back soon!  Sharing some exciting news soon!

Supplies:
Stamps:  JustRite-Small Oval Wishes
Dies:  JustRite-A2 Butterfly Card Front, Vintage Labels, Hello Decorative Oval
Ink:  Black Tuxedo Memento, Distress Ink- Scattered Straw; Copic Markers-R85, RV02, YG11, 63
Paper:  Photo Play-Julie Nutting Belle Vie, basic white and black
Embellishments: Recollection rhinestones, Prima jute, tulle ribbon, black embossing powder

Wednesday, June 22, 2016

Clean and Simple Style

I'm a fan of a stamp set that can give me a lot of options.  One of my favorite things to do is try to think of other ways to use stamps.  This card was created using the JustRite Planner Hex Page stamp set....yep, planner stamps to make a birthday card!


Here is the stamp set I used:


That little row of water drops in the bottom right corner ^^^^^^^

I used an ombre ink technique to stamp these together to create the geometric designs in the corners.
Then the JustRite Happy Birthday Sentiment Die finishes it off to make this a super quick and easy card.


Thanks for stoppin' by today!

Supplies:
Stamps:  JustRite-Planner Hex Page
Dies: JustRite- Happy Birthday Sentiment
Ink: Hero Arts Ombre Ink (orange)
Paper:  Basic white and orange cardstock
Embellishments:  Recollections enamel dots